
A 3D printed spacer is a simple part that is very easy to get slightly wrong. Measure the screw and the gap, add clearance to the hole, choose a material that suits the temperature and load, print it upright for accurate height, and keep it away from anything safety-critical. This guide covers each step, and the differences between spacers, washers and shims, so you can send a file for printing with confidence.
TL;DR
- A spacer holds parts a set distance apart, a washer spreads a load, and a shim fills a small gap. Name the job first, because it decides the material and the tolerances.
- Printed holes usually come out smaller than drawn, so add clearance: about 0.2 mm per side for a snug fit, more if the part must slide.
- PLA suits cool, indoor, static jobs. PETG suits warmth, moisture and handling. Nylon or ASA suit rubbing or sustained sun.
- Print spacers upright for accurate height, washers flat on their face, and thicken walls where side loads act.
- Do not use printed plastic for bolt preload in structural, vehicle, ladder or mains-powered applications.
Table of Contents
- Spacer, washer or shim: what each part actually does
- Measuring the gap and the fastener
- Sizing the part: starting dimensions
- Choosing a material for a spacer
- Print orientation and settings
- Where a printed spacer is the wrong answer
- Finding or creating the model
- Getting your spacers printed
- Our view on printed spacers
- FAQ
- Sources
Spacer, washer or shim: what each part actually does
The three words get used loosely, and one part can do more than one job. A common engineering rule of thumb is that a washer spreads load, a spacer separates parts by a known amount, and a shim fills an unwanted gap. Getting this straight before you model anything saves a reprint.
| Part | Main job | What matters most | Typical shape |
|---|---|---|---|
| Spacer | Holds two parts a fixed distance apart | Exact height, flat ends | Sleeve or block with a bore |
| Washer | Spreads the clamp load under a nut or bolt head | Flat face, compressive strength | Thin flat ring |
| Shim | Takes up a small gap or adjusts alignment | Exact thickness | Very thin sheet or ring, often a slot |
In practice, a printed “washer” is often really a thin spacer: a flat ring that lifts a component off a surface, protects a painted panel, or stops a screw from sinking into a soft material. A shim is usually the thinnest of the three, used to level a bracket or take up play in a mount.
The useful question is not what to call the part but what you are asking it to do. If it only sets a distance and sits still, it is an easy print. If it is clamped hard by a bolt, or something rubs against it, the demands rise sharply and the material choice matters far more.
Measuring the gap and the fastener
Most failed spacers fail at the measuring stage, not the printing stage. A few habits make a large difference.
- Use calipers, not a ruler. For any dimension that decides the fit, measure it three times and record it in millimetres.
- Measure from one reference corner. If a part has several features, take each position from the same edge rather than adding up a chain of small measurements, which lets errors accumulate.
- Measure the screw, not the label. Check the actual thread diameter and the head diameter, particularly on old or imported hardware.
- Measure the gap under load. If the parts flex when tightened, the real gap is the one you have when the fixing is snug.
- Note the mating surfaces. A spacer landing on a curved or angled face needs that angle in the model, not a flat end.
Write the numbers down as inner diameter, outer diameter and height. Those three values, plus any chamfer, describe almost every round spacer or washer you will ever need.
Sizing the part: starting dimensions
Start from standard clearance holes. For metric screws from M3 to M8, the ISO 273 medium-series clearance diameters are 3.4, 4.5, 5.5, 6.6 and 9 mm. One published set of practical washer sizes gives inner diameter, outer diameter and thickness as follows, from M3 to M8:
| Screw | Inner diameter | Outer diameter | Thickness |
|---|---|---|---|
| M3 | 3.4 mm | 7 mm | 0.5 mm |
| M4 | 4.5 mm | 9 mm | 0.8 mm |
| M5 | 5.5 mm | 10 mm | 1.0 mm |
| M6 | 6.6 mm | 12 mm | 1.6 mm |
| M8 | 9.0 mm | 16 mm | 1.6 mm |
Treat these as starting points. For a spacer with a thicker body, one design guide works from the rule that outer diameter equals inner diameter plus twice the wall thickness, and suggests a wall of at least 1.5 mm, rising to 2 to 2.5 mm for load-bearing standoffs.
Allow for how plastic prints
Printed holes rarely match the drawing. Reports from designers say PLA and PETG holes commonly emerge 0.2 to 0.4 mm smaller than drawn, while outside walls grow by roughly 0.1 to 0.2 mm. The same source suggests about 0.2 mm of clearance per side for a snug fit, 0.5 mm for a sliding fit and 1 mm for a drop-in holder.
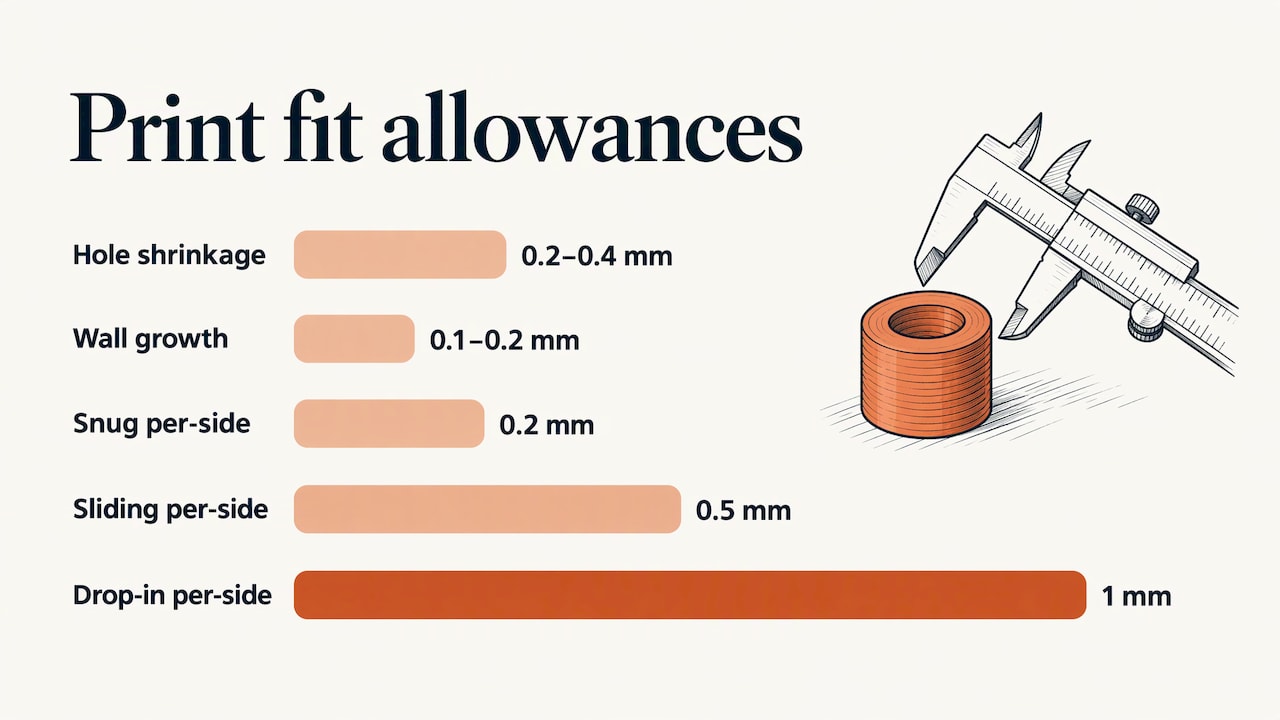
If a screw still will not pass, one maker recommends enlarging the hole by 0.2 to 0.3 mm, or opening it with a matching drill bit after printing. Either fix is easy to apply to a part that is already in your hands, which is a good reason to order one test piece before a batch.
Worked example
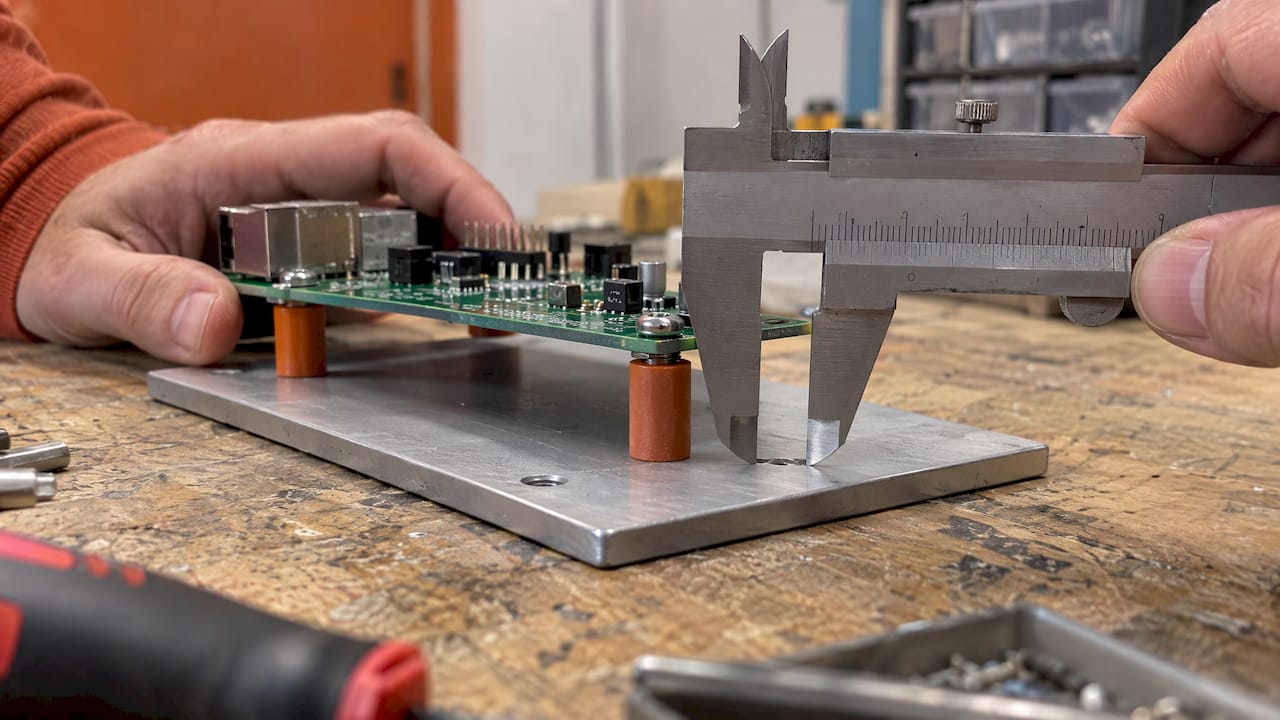
Say you need to lift a small circuit board 10 mm off a panel using M3 screws. Model a sleeve with a 3.4 mm bore, a 1.5 mm wall (so an outer diameter of 6.4 mm, rounded to 6.5 mm for a neat figure) and a height of exactly 10 mm. Because printed bores tend to shrink, you might open the bore to 3.5 mm. Print it upright so the height is accurate, and check it with calipers and a real screw before ordering a set of four.
Choosing a material for a spacer
There is no single best filament. What matters is stack height accuracy, how the part behaves under long-term clamping, the temperature it will see, and what happens if it fails.
- PLA is easy to print and dimensionally repeatable. It is suited to indoor, cool, static jobs. PLA softens from around 55 to 60 °C, so a spacer near a heater, a car dashboard or a sunny window is a poor fit.
- PETG is tougher and handles moisture and handling better. The same reference puts its softening range at around 70 to 80 °C. It is the sensible default for garages, sheds and general workshop use.
- ASA (and ABS) copes with higher temperatures, roughly 95 to 100 °C, and is the usual pick for sustained outdoor sun and weather.
- Nylon suits parts that rub, slide, cycle or are removed repeatedly, because it resists wear better than the others.
The key word is creep. Plastics slowly deform under steady load, and they lose stiffness as they warm. The same engineering reference advises designing long-term loads far below short-term strength. A spacer that holds a screw tight on day one can loosen over months if the plastic is squeezed hard and kept warm.
For a spacer that only locates something, such as a PCB standoff, a lid gap or a cosmetic lift, PLA is usually perfectly adequate. For a part that lives in a van, a boat locker, a garden or a warm cabinet, step up to PETG or ASA. If you are unsure, describe the use to us and we will suggest the material. Matching material to the intended use is part of how we work.
Print orientation and settings
FDM parts are built layer by layer, and they are not equally strong in every direction. Design guidance from a major industrial printer maker explains that interlayer bond strength governs strength in the Z direction, while tensile strength is generally higher in the X-Y plane. Two identical-looking spacers can therefore perform differently depending on how they were printed.
Spacers
For a spacer loaded mainly by squeezing along its axis, print it upright with the axis vertical. That gives a clean round bore and an accurate height, and the layers are stacked in the direction of the compression. The trade-off is that upright parts are weaker against side-load bending, so thicken the wall if the spacer will be knocked or pushed sideways. A very tall, thin tube can also tip during printing, so a stabilising base, or printing several together, helps.
Washers and shims
Print a washer flat on its face. Thin discs print quickly, and the flat bottom face is smooth. Shims follow the same logic: print them flat, and keep an eye on first-layer thickness because that is a large share of a very thin part.
Layers, walls and infill
Layer height controls vertical resolution and print time, and should generally not exceed 80% of the nozzle diameter. The same knowledge base notes that strength is mostly set by the number of perimeters rather than the infill. For small spacers, that means choosing more wall, not more infill, since a small part is mostly wall anyway.
A popular parametric spacer model suggests 0.12 to 0.20 mm layers, at least three walls and 100% infill for structural or mechanical parts. For a structural washer profile, one designer specifies PETG or ASA, more than ten perimeters and says PLA is unsuitable for that geometry. The pattern is consistent: the harder the part is clamped, the more wall and the tougher the filament.
Where a printed spacer is the wrong answer
Printed spacers are excellent for locating, lifting, aligning and protecting. They are not a substitute for specified hardware where failure could hurt someone.
Keep printed plastic out of any joint that carries sustained tension or heavy bolt preload. The UK government’s report on printing consumer appliance spare parts notes that print quality varies with calibration, feedstock, settings and software, and that printed parts can be weak in one plane, moisture-sensitive or unsuitable where flammability or electrical insulation is required. It also states that existing product-safety and liability law applies to 3D-printed parts, and that no UK legislation specifically regulates 3D printing.
In practical terms:
- Do not use a printed spacer where a loose joint could endanger people or cause damage, including vehicles, ladders or mains-powered devices.
- Avoid thin printed parts under sustained tension or bolt preload, and keep them away from heat sources.
- For brakes, steering, bearing preload, pressure fittings, load-bearing fixings or anything electrical, buy the specified commercial part.
- Where a printed part sits somewhere you cannot easily see it, check it periodically and keep a spare.
This is the line that keeps printed parts useful. Cable guides, PCB standoffs, appliance feet, tile gaps, furniture levelling, camera mounts, craft projects and prototype fit checks are all well within what a good print can do.
Finding or creating the model
You have three routes to a print-ready file.
- Download a ready-made model. Large free libraries hold round and square spacers in metric and inch sizes. Check the bore against the clearance figures above before you trust it.
- Use a parametric generator. A browser-based parametric model lets you edit inner diameter, outer diameter and height and is designed for printing without supports. A generator for round or hexagonal parts can export an STL already oriented upright without supports.
- Have it designed. If the part has an awkward shape, such as an angled face, an o-ring recess or a slot, describing it or sending a photo is quicker than learning CAD.
Whichever route you take, export as STL or 3MF, keep dimensions in millimetres, and check the model at full scale before uploading.
Getting your spacers printed
If you do not own a printer, or you only need a handful of parts, uploading the file is the quick route. At Tap3D you upload an STL or 3MF, see a price immediately and order without creating an account. Printing starts from £8. You can collect locally from Ellesmere Port at no charge, have local delivery across the Wirral and Chester for £4, or choose Royal Mail UK delivery at £3.75.
If you do not have a model, we offer design from a photo or description at £25 to £40 per hour, which suits the odd-shaped spacers that off-the-shelf libraries do not cover.
Start with our custom 3D print page, or see the full range of services on the Tap3D home page. If you want ideas for other practical prints, browse the model catalogue.
Our view on printed spacers
Most people who come to us for a spacer know exactly what they need it to do, but not which plastic to choose. That is the part we think should be easy.
Our approach is to tell you what the part has to cope with, whether that is warmth, damp, sun, a tight screw or just sitting still, and pick the material from that. You should not need to know the difference between PLA and PETG to get a part that lasts.
We also think a price should not be a guessing game. You upload the file, you see the cost, and you order without an account. For small functional parts, that matters more than anything fancy.
A first print is the cheapest way to confirm a fit, so we would rather you order one properly specified part than a box of the wrong size. Our turnaround is checked by a person, because a spacer that is out by half a millimetre is useless.
Rafal
FAQ
Can I 3D print a washer instead of buying a metal one?
For light jobs, yes: protecting a surface, lifting a part, or spreading a small load on soft material. Use PETG or ASA rather than PLA for anything clamped firmly. For structural, vehicle or electrical fixings, use the specified metal washer instead.
How much clearance should I add to the hole?
Printed holes commonly come out 0.2 to 0.4 mm smaller than drawn. Allow about 0.2 mm per side for a snug fit and 0.5 mm if the part needs to slide. If a screw still binds, open the hole slightly with a drill bit.
What is the best material for a printed spacer?
It depends on the setting. PLA works for cool, dry, static indoor use. PETG is the better general choice where there is warmth, damp or handling. ASA suits long outdoor exposure, and nylon suits rubbing parts. Tell us the use and we will advise.
How thin can a printed shim be?
Very thin shims are limited by layer height and nozzle size, and the first layer makes up a large share of the thickness. Printing flat and using fine layers helps. For precise gap adjustment, print a test piece and measure it with calipers.
Do I need a 3D model to order?
No. If you have an STL or 3MF file, upload it for an instant price. If you only have a photo or a description of the part, our design service can create the model for you, billed hourly.
Sources
- How do we specify among a shim, spacer, and washer?
- How to measure an object for a 3D printed part that fits
- Spacer and washer generator: custom STL for 3D printing
- How to Design a Washer or Spacer (Sizes for M3, M4, M5, M6)
- How to design 3D printed standoffs and spacers that fit
- Strength, Accuracy and Fits, Engineer Underground
- Stratasys FDM design considerations
- Layers and perimeters, Prusa Knowledge Base
- Functional Washers for PETG/ASA, Printables
- Ultimate Parametric Spacer & Washer, MakerWorld
- 3D Printing of Spare Parts for Consumer Appliances, UK government